In today’s digital age, individuals and creators are looking to monetize their digital creations to make money without investing money online. It meets the needs of content creators in the digital economy. If you’re good at making art, writing stories, or building websites, and you’re thinking of turning those skills into digital products to share with others, finding a place to sell them can be challenging.
If you’re hesitant to invest in creating a website for your digital product because you’re unsure how to attract traffic, you might be searching for free online store options. So, there’s plenty of time to improve your digital product and focus on promoting your store. That’s where Payhip comes in.

In this tutorial, we provide a detailed, image-guided walkthrough on how to create a fully functional premium website for selling digital products at absolutely no cost. Making an eCommerce store usually costs a lot of money. However, here, you’ll learn how to create a digital product shop with advanced features for free. You don’t need to invest in WordPress, WooCommerce, Shopify, or any eCommerce theme. Other than themes, you also receive a free subdomain and the option to connect with a top-level domain. Additionally, users won’t have to worry about renewing hosting.
Before you begin this journey with visual guidance, I highly recommend creating a Payhip account for free. You’ll get access to all the features from the plus and pro plans. Take advantage of the exclusive NewOfferSee offer to access premium features for free forever, but act fast as this offer is only available for a limited time.
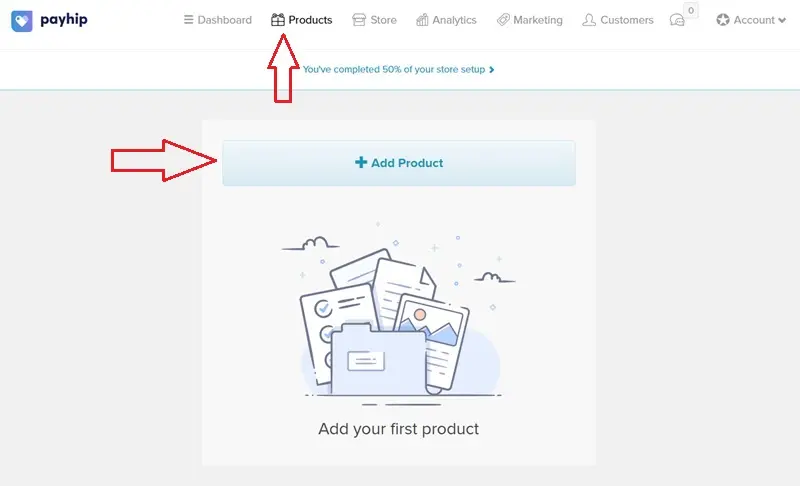
Step 1: Navigate to Products
To begin, sign up for a Payhip account. Navigate to the Payhip homepage and select the “Get Started for Free” option. After you log in, you can access your dashboard.
In the Payhip dashboard, find the “Products” link (as shown in the step 1 image). You can see it in the navigation bar at the top of the page. After selecting the “Products” link, it will direct you to an area where you can manage your products. To add your first product, locate the “+ Add Product” button. Press it to set up a new product listing.
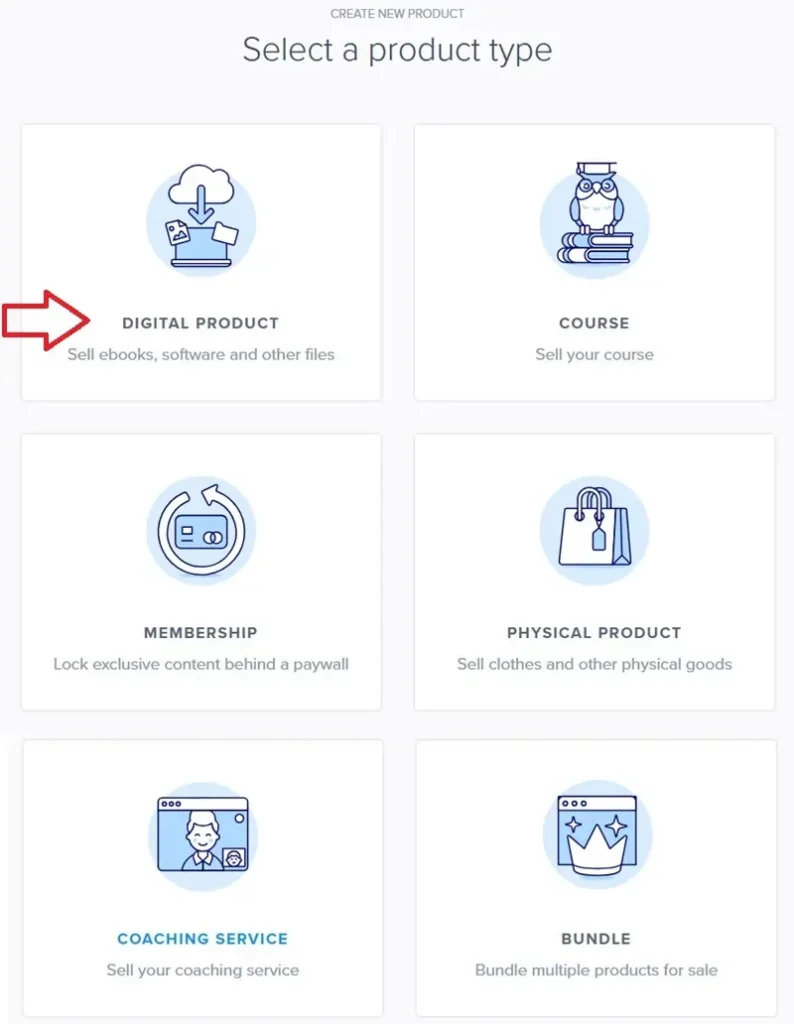
Step 2: Select Product Type
Once you’re in the Products area, you’ll be able to manage and organize your offerings. Whether you’re selling digital products, physical goods, courses, memberships, or other services, this is where you’ll set up and customize your product listings. For now, since our focus is on digital products, let’s explore the “DIGITAL PRODUCT” link, which allows you to sell ebooks, software, and other digital files.
Step 3: Upload Product and Write Details
The third and most crucial step is uploading a new digital product to your online store. Users can upload their digital product files (up to 5GB) by clicking the “Upload product file” button. When uploading the first file, you have the option to include multiple files, and they can vary in type, such as zip files, PDFs, or any other file format. After uploading, users can also rename the file name as needed.

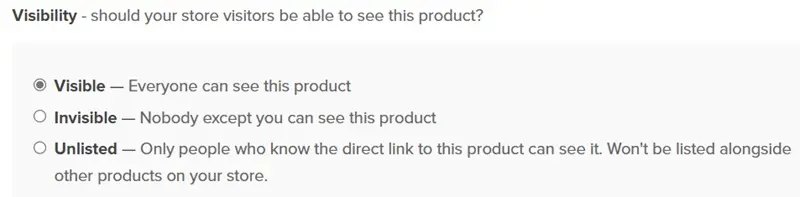
After uploading the product, users can adjust its visibility by selecting from options such as visible, invisible, and unlisted. When set as unlisted, only individuals with a direct link to the page can access it.
Step 4: Write Title and Description
Write the title and set the price for your product in multiple currencies. You can set any price you want, but if you want to offer your product for free, you can simply set the price to 0. To set up Pay What You Want pricing, simply add a “+” symbol to the end of your product’s price. For instance, if you input “0+” in the price field, customers can freely choose any amount to pay, including nothing. Similarly, typing “14+” requires customers to pay at least $14 but allows them to pay more if they wish.
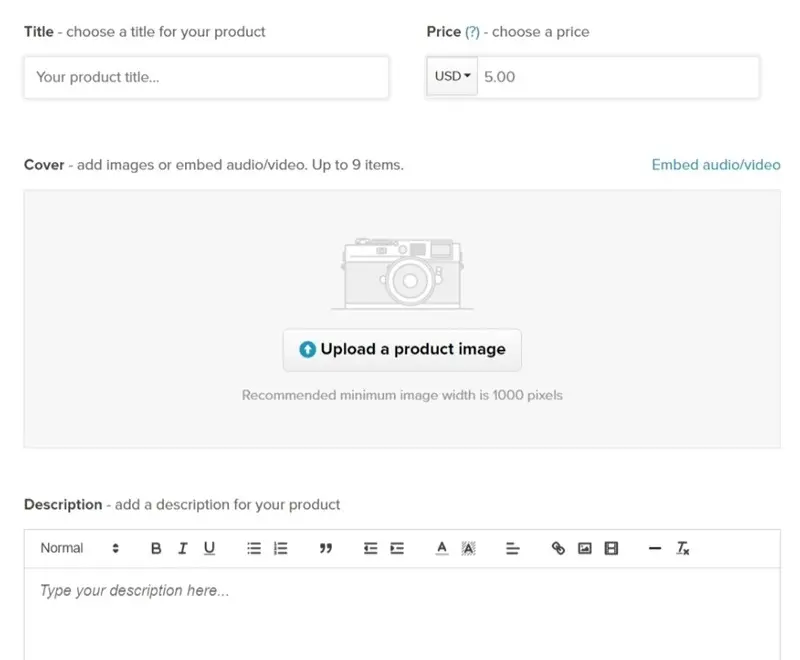
Next, upload an image (up to 9 items) related to the product. The recommended minimum image width is 1000 pixels. When customers look at the product page, they will see these pictures. Additionally, you can embed audio or video files by selecting the “Embed audio/video” link and pasting an external link.
Write your product description using the rich text editor. For article headings, use h1 to h4 tags and format the text with bold, italic, and underline styling. Create bullet and numbered lists, as well as blockquotes, outdent, and indent, to give your description a professional appearance. Experiment with changing the text and background colors. Use horizontal lines to separate paragraphs. Align your text and insert links as needed within your paragraphs. Additionally, enhance your description with images and videos. You can easily add them using external URLs, making sure your content remains lightweight.
Must-See Content: 25 Tips to Promote Your Payhip Products & Get Sales Quickly
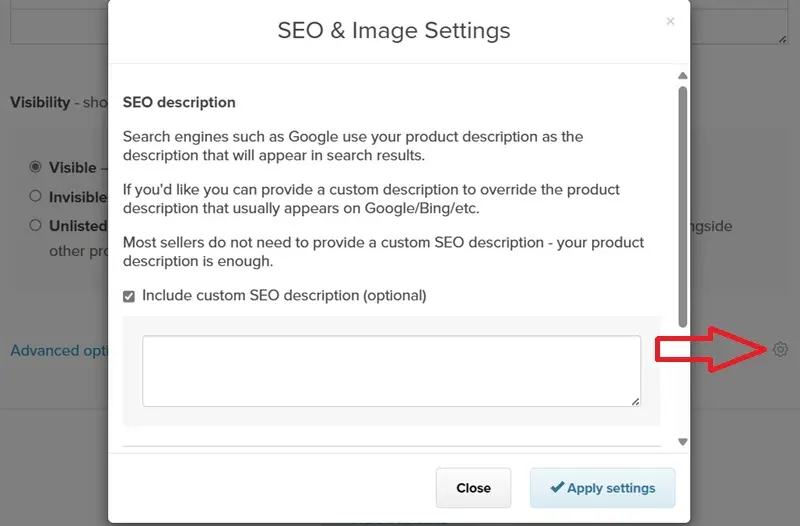
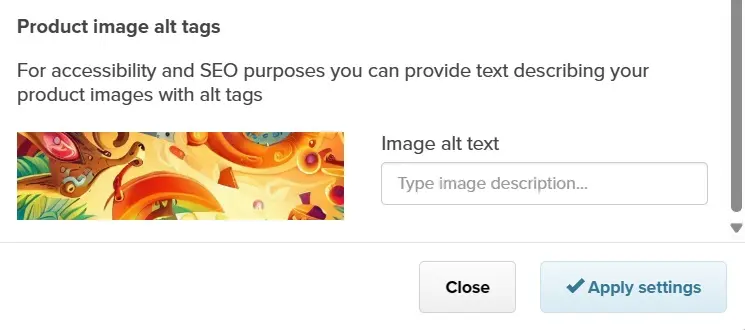
Meta SEO Description
Press the small settings icon located below the visibility section and next to the advanced options. Payhip provides you with all the SEO tools necessary to enhance your product’s ranking in search engines. Check the box for “Include custom SEO description (optional)” and write your product description. Moreover, users can write alternative text for product images to enhance SEO. We strongly advise writing both the meta description and alt image text, then clicking on “Apply settings.”
Advance Options
Payhip provides users with all the premium tools necessary to sell digital products effectively. In the advanced options, you can decide if your product comes in different versions. For example, you can offer three packages in one product, like a free license for $0, a premium license for $25, and so on. This allows you to offer various options to your customers and manage your product listings more efficiently.
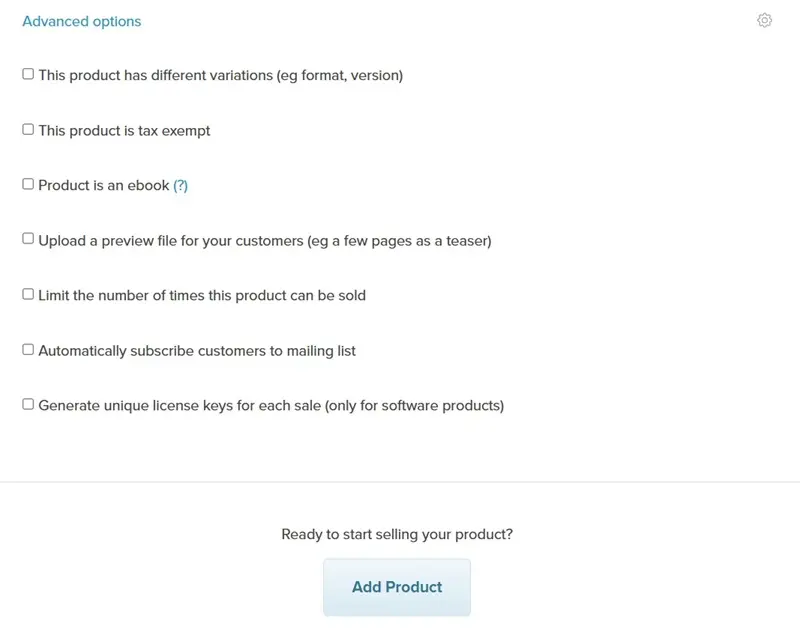
Next, indicate if your product is tax-exempt and specify that it’s an ebook. Give customers a sample file, such as a few pages, to preview the product. You also have the option to restrict the sales quantity of the digital product. Add customers to your mailing list automatically. Payhip automatically generates unique license keys for each sale, but note that this feature is specifically for software products.
Finally, users can click the “Add Product” button to complete the process. This form allows you to create and manage digital products effectively within your Payhip store!
Product Added to Your Store
The next page will confirm that you have added your digital product to the online store. To see the product you’ve just added, press the blue button “Show me my product page.” Payhip provided a URL link for sharing the product page. This link enables you to start selling your product. At the bottom, there are options to “Share on Facebook” and “Share on Twitter.”

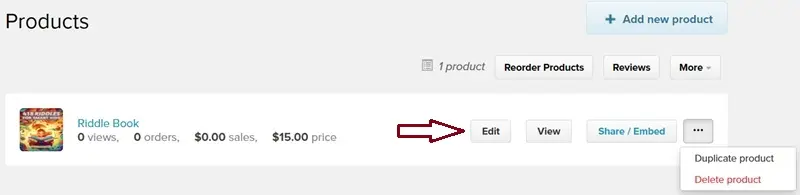
Edit Products
Once you’ve added a digital product to your store, editing it is simple. Simply navigate to the product link in the top navigation bar and select “Edit.” You can also add more digital products to your store by clicking on Add New Product. Additionally, you can create duplicate products or delete them if needed.
Embed Buy Now Button in Blogger
If you’ve built a website on Blogger and want to sell digital products, you can do so using Payhip’s embed feature. Simply go to the product link in the top menu and select the Share/Embed button. In the Embed Button tab, you can customize the button text, color, and type (direct purchase or add to cart). After finishing your customizations, press “Get Your Embed Code,” and then copy the code to insert it into your Blogger page. Users can also embed a product page on their website or blog.

Step 5: Payment Setting
After adding a product to your store, you must first connect your Paypal or Stripe account to your store. To do this, go to Account > Settings > Payment Details and click on Link PayPal Account or Accept Payments with Stripe. Select the primary currency for your store.
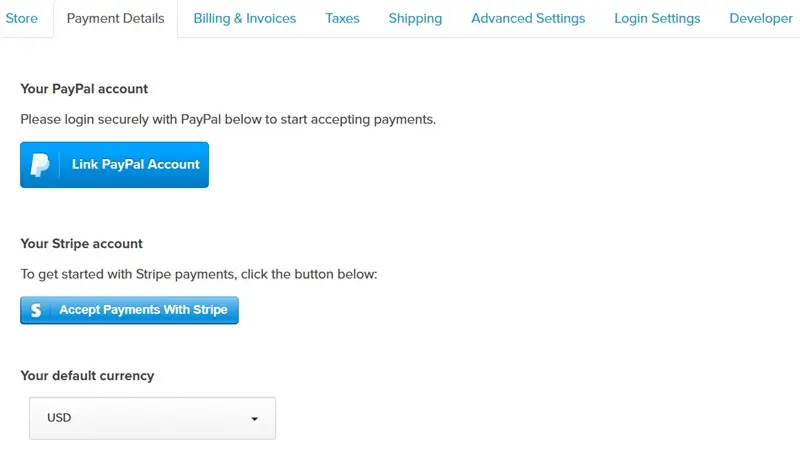
Also, write a short description for your bank statement that your customers will see. Make sure they can recognize it’s you, and keep it under 11 characters. Once you’ve finished making payment settings, remember to click on “Save Settings.”

More Settings
In the advanced settings, input your unique Google Analytics ID and your Facebook Pixel ID. In the checkout settings, you can direct customers to a specific webpage after they complete checkout. Also, add your own questions for customers to answer during checkout, and block certain countries from making purchases. To send a product email to your customer, you can also personalize the email receipt subject line and message. Additionally, you can include your business address on the invoices customers receive, as well as add your logo to both invoices and email receipts.
Step 6: Connect Custom Domain
Your store currently operates on a free Payhip domain. To change this, navigate to Account > Settings, and under the Store section, modify the Payhip username to update the free Payhip domain.

To connect your own domain to your Payhip store, you’ll first need to purchase a top-level domain from Namesilo. You can apply the promo code “domainhost” to get an extra $1 off on your Namesilo purchase.
To connect your third-party domain to Payhip:
- Log in to your domain provider’s account and find your DNS settings, domain management, or DNS configuration.
- Select type A Record. In the Host field, type “@” and in the Value field, enter 45.154.183.183. Set the TTL dropdown to 60 minutes.
- You can update the “CNAME record” for the “www” host by changing the value to domains.payhip.com
Must-See Content: 32 Reasons Why Payhip is the Best for Selling Digital Products

After entering the CNAME and A Record, save the settings, and then go to your Payhip account. To use your own domain for your Payhip store, click on “Store” in the top menu, then choose “Domains.” Afterward, choose the option “Connect Existing Domain” and input the domain you want to connect. Then, press the “Verify Connection” button. Wait a few minutes, and you will have connected your Payhip store to your top-level custom domain.
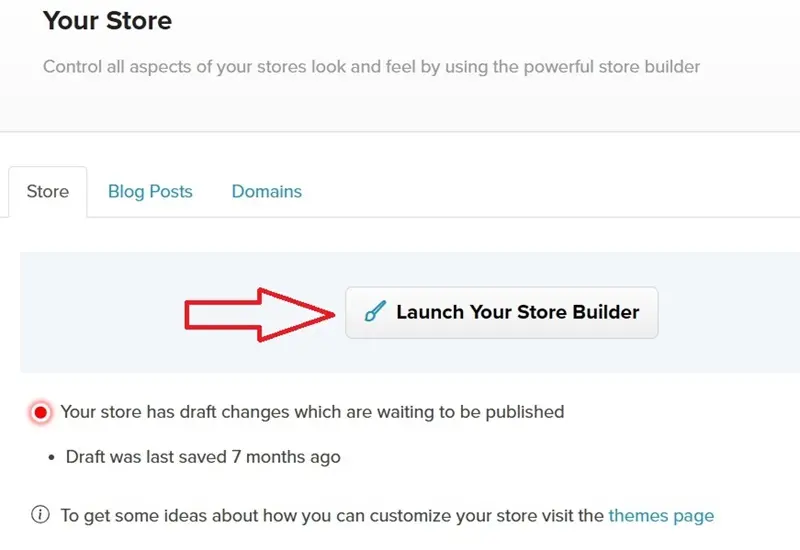
Step 7: Launch a Free Responsive Website
Now it’s time to give your store a professional appearance with Payhip’s responsive e-commerce theme. Simply click on “Store” in the top menu, then select the Store tab, and click on Launch Your Store Builder. In the e-commerce website builder, scroll down to the bottom and choose “Change store style.”
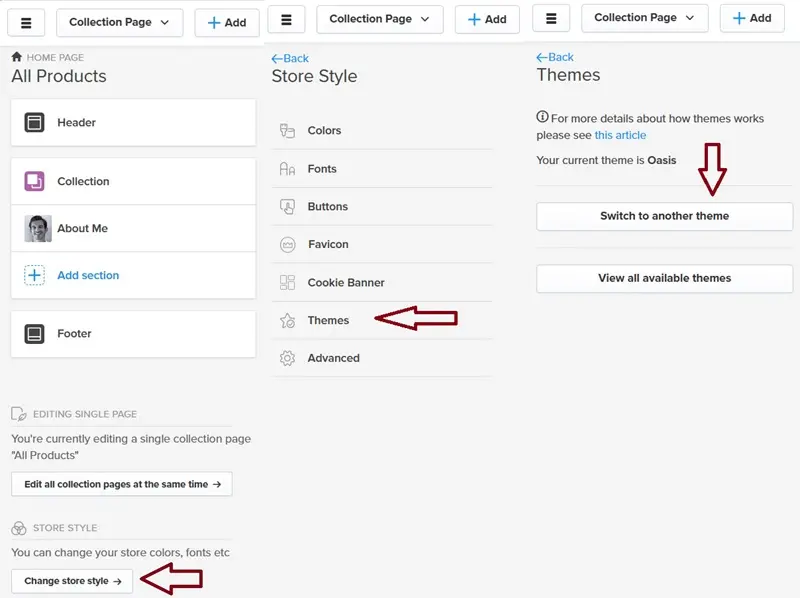
In the store style section, click on Themes, then select Switch to another theme. To see how the theme looks, select a preview. Once satisfied, click the “Choose” button. Another screen will appear, asking for confirmation. To apply the new theme to your Payhip store, click on “I Understand, Switch Theme.”
The Payhip store builder offers all the tools you need to create a free website for selling digital products. You can add various sections to your store. It’s similar to adding web elements and widgets to a WooCommerce store with Elementor. Payhip provides pre-designed headers, footers, about me sections, and contact us pages. You can also add featured products, blog posts, newsletters, testimonials, FAQ sections, and an embed code section.
You can customize your store’s colors and fonts by clicking “Change store style.” Modify the button shape and upload a favicon. Display a cookie banner to inform visitors about cookies and allow them to accept them. In the advanced settings, add custom CSS code for store pages and the checkout page. Additionally, include header code before the closing head tag. Users can also add JavaScript and HTML code in the footer section before the closing body tag. Adding code in the header works after you’ve linked a custom domain to your store.
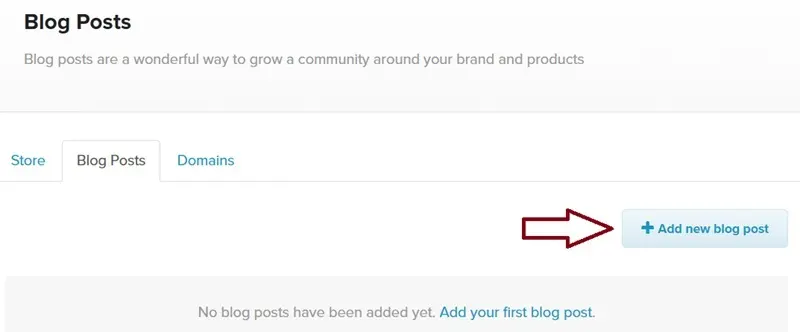
Add Blog to Your Store
To add a blog to your store, start by clicking on the “Store” link in the top menu. Then select the Blog Posts tab and click on “Add new blog post.” Writing unique blog posts related to your niche can boost sales of your digital products. With Payhip, you can create multiple blogs. Write the title and content for your blog, add a feature image, and adjust visibility settings. You can also include the author’s name and customize the blog post page URL. However, Payhip’s blog section lacks a meta description field and categories, which is a downside. You can add sections to blog post pages using the Payhip store builder.
Last Step 8: Analytics and Marketing
Navigate to the analytics section using the top navigation bar. Here, you’ll find Payhip’s built-in analytics for all your products and stores. You can view daily traffic and sales, as well as set custom dates. Payhip analytics also provide complete statistics for total sales, unique customers, total orders, and total views. Furthermore, it also shows your top 10 visitor sources and a map of visitor locations. Payhip does not count the user’s own visits to their Payhip store in the analytics.
Premium Marketing Tools
Payhip gives you premium marketing tools for free. Even WooCommerce does not include these marketing features. You don’t need to add a plugin to activate Payhip features. All are built-in and lightweight.
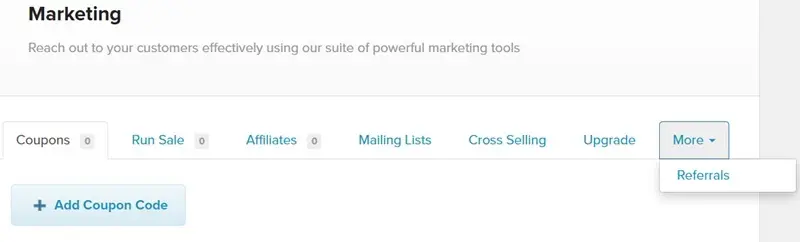
Navigate to the marketing section using the top navigation bar. Cross-selling and coupon codes are powerful tools to encourage users to buy products. In the marketing section, users can add coupon codes to their store and run sales. In the coupon section, users must enter a promo code to get a discount, while in the Run Sale section, customers receive discounts without needing a promo code. Both sections allow users to choose between a percentage discount and a fixed-amount discount. In both sections, you have the ability to control the coupon’s usage by setting a limit. Additionally, you can determine the coupon’s validity period by selecting the start and expiration dates.
Affiliate System
You don’t have to join ShareASale, CJ, or Impact to promote your store’s products. Users can create a free affiliate and referral system in their Payhip store. Selling your products through affiliates is a great way to increase your sales and marketing efforts. Payhip provides ready-made affiliate sign-up forms and pages. Share the affiliate sign-up page link with your friends, bloggers, influencers, and YouTubers. After signing up and receiving your approval, affiliators can help spread the word about your digital product. You’ll be responsible for paying affiliates yourself.
Must-See Content: 17 Best Places to Download Free Graphics and Vector Designs
Payhip Free, Plus, and Pro Plans
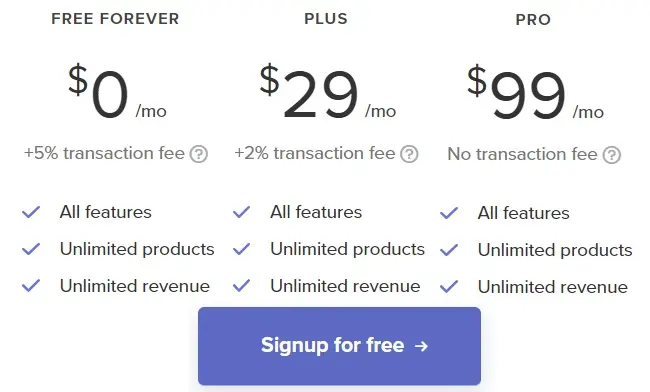
Payhip aims to keep pricing simple and transparent by offering access to the same features across all plans. The differences between Payhip’s Free, Plus, and Pro plans mainly revolve around transaction fees and monthly costs. The Free Forever plan has no monthly cost, but there is a 5% transaction fee on sales. It includes all features, unlimited products, and unlimited revenue. The Plus Plan costs $29 per month and reduces the transaction fee to 2%. The Pro Plan costs $99 per month and does not have a transaction fee. Both the Plus and Pro plans include all features similar to the Free plan.
Conclusion
In summary, Payhip is a great option for anyone wanting to sell digital products online without spending money. It’s easy to use and comes with helpful features like free e-commerce themes, a website builder, analytics, coupon codes, and affiliate systems. Payhip provides responsive checkout and the option to embed checkout and shopping carts on your website, enabling sales from anywhere. Customers have immediate access to download their purchased files, and they also receive a download link via email. Payhip accepts PayPal and all major international cards, making it easy for customers to make purchases.
Whether you’re an artist, writer, or entrepreneur, Payhip gives you everything you need to showcase your work, reach more people, and make money online. We welcome your comments and questions about your experience selling digital products with Payhip. Feel free to share below!

Author: Asif
Asif is a freelance writer who shares his knowledge and experience on how to build and run a successful online business. Whether you are a beginner or a pro, you will find valuable tips and resources on his blog » NewOfferSee Digital Time »
Contact Asif via the NewOfferSee Contact Us form.
Follow Asif on his Quora “DigitalTime” Profile.