In today’s world, many people want to learn things online. As a teacher with valuable skills to share, you earn money by creating an online course and selling it on your own website. However, you don’t know how to make your own website, and you can’t find any website themes that include the features you need for online courses.
Making an online course and then selling it on your own website is quite challenging. Many online platforms offer the ability to create an online course website, but they often come with high fees. Today, we’ve discovered a platform named Payhip. Here, users can create an online course website without paying any fees while enjoying all the advanced features. The free forever account on Payhip is available for a limited time only, so sign up quickly and start selling your courses now.
Payhip is an online platform that simplifies the process of creating digital courses. It helps you receive payments and provides a branded learning experience for your students. Students create their own account on your website and access course content, which can include various lessons. They can watch your course lessons on a player that has your brand on it. Your course can have videos, text, quizzes, downloads, surveys, assignments, and other stuff. Payhip helps you create a professional sales page and set flexible pricing options. Plus, Payhip offers certificates for course completion.

In this guide, we’ll show you how to use Payhip to make your own website for free in minutes. You’ll see how simple it is to set up your online courses for free and customize your site. To start, jump into our easy-to-follow tutorial with helpful pictures.
Step 1: Select Course
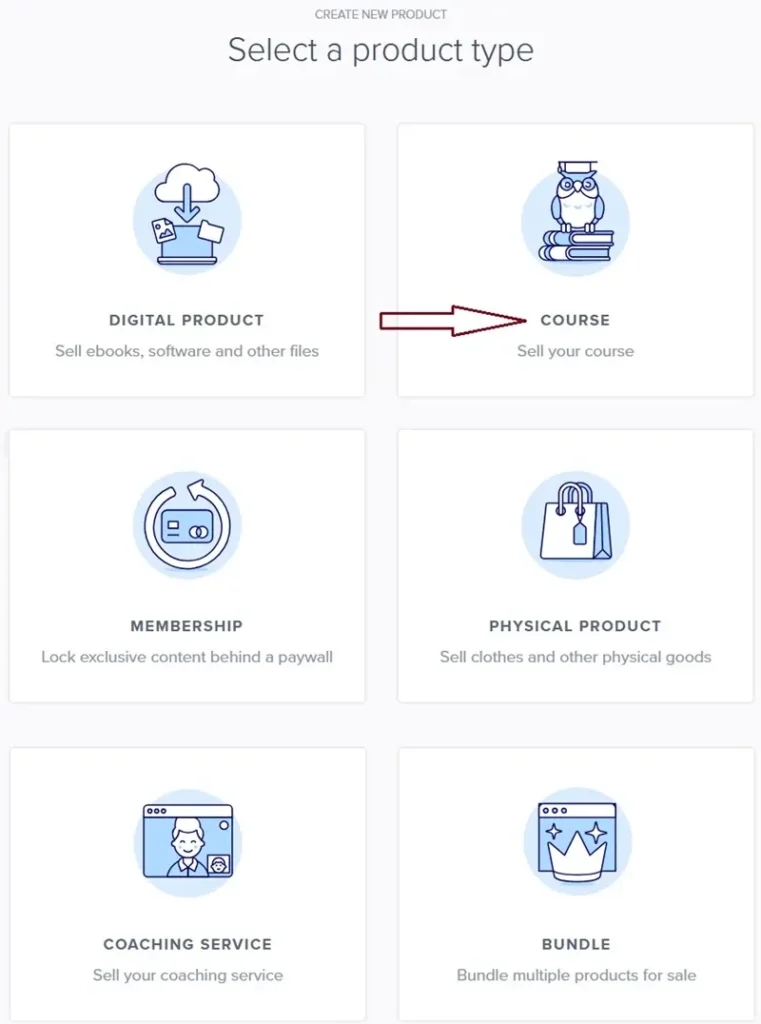
To start selling courses on Payhip, you’ll need to first register for a free account. After logging in, Payhip will direct you to the dashboard. From there, head over to the ‘Products’ section at the top navigation bar. Then, you’re ready to add your first product by selecting the ‘Add Product’ button.

A new window will pop up, presenting you with different product types to choose from. Since this guide focuses on selling courses, you should choose the ‘Course’ option to proceed with setting up your course for sale on Payhip.
Step 2: Add New Course
To add a new course, simply find the “Course title” text box and enter the course title. After typing in the title, you can finalize the addition by clicking the “Add Course” button located to the right of the text box. This will start the process of adding the course under the title you’ve entered, and you can always change this title at a later time if necessary.
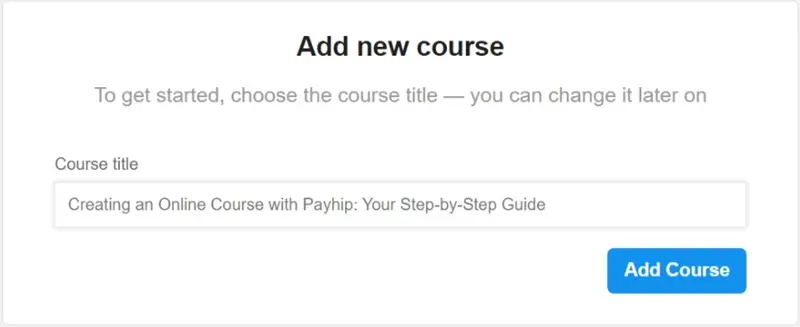
In this guide, as an example, we’re adding a course title, “Creating an Online Course with Payhip: Your Step-by-Step Guide.” We’re doing this to show you how it works.
Step 3: Manage Course Curriculum
The next scene displays the user interface for the online course “Creating an Online Course with Payhip: Your Step-by-Step Guide.” Here, teachers can manage their course’s curriculum. At the top, you’ll find several tabs. These include curriculum, settings, pages, pricing, members, and certificates. They help you navigate different parts of the course management system.
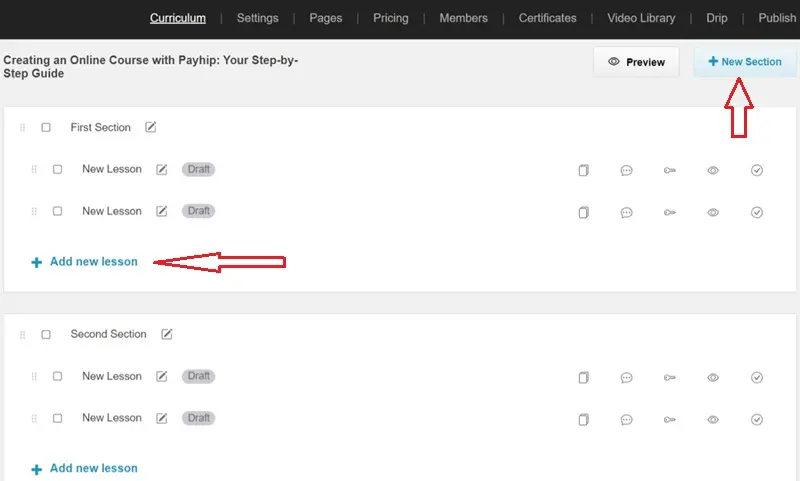
The interface includes options for managing the course curriculum, such as adding new sections and lessons. The course title is displayed prominently. Below it, there are sections for organizing lessons. As shown in the image, red arrows point to buttons labeled “+ New Section” and “+ Add New Lesson.” You can use these buttons to add new sections and lessons to the course content.
Lessons that are in draft form indicate they’re not yet finalized. Teachers can use the preview button to see changes before publishing new lessons. This Payhip website builder lets you make a learning management system. A learning management system serves as a platform for hosting your online courses. It helps you organize your courses by breaking them up into sections and lessons.
Step 4: Start Creating Lessons
To initiate the new lesson, click on the “New Lesson” bar. This action will allow you to start creating or inputting the content for your new lesson into the curriculum.
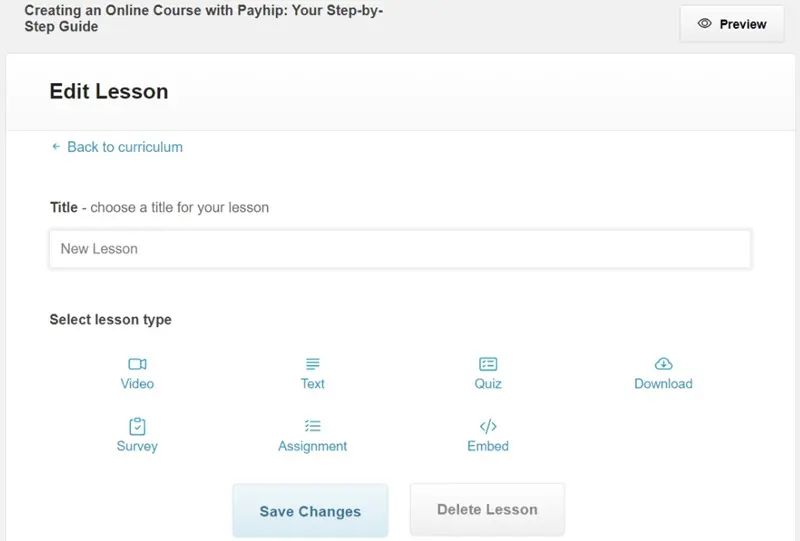
Here, you’ll find a field to enter the title of your new lesson. Choose a descriptive and relevant title that reflects the content of the lesson. Next, select the lesson type from the available options, such as video, text, quiz, embed, etc., to match the kind of content you’ll be providing.
Video Lesson
When you choose a video lesson type in your online course, you have the option to upload a video file. The maximum file size allowed is 4GB. It can be in various formats, such as mp4, mov, and webm. Payhip suggests using HandBrake to compress your videos, which can help reduce the file size without significantly affecting the quality.
In the free version of Payhip, video uploads are not available. To upload videos, you need to sign up for Payhip Videos, which is a premium feature and requires a subscription fee. Accessing the video library is simple. From the course management page, click on the Video Library link to find three tabs: video library, video analytics, and video subscription. These tabs help users easily browse, analyze, and manage video content. The video service subscription costs $5 each month. A teacher can upload videos for up to 16 hours.
Must-See Content: 5 Sites to Upload Videos & Monetize Content » YouTube Alternative
If you’re not ready to upgrade, you can embed lesson videos instead of directly uploading them to Payhip. This allows you to use videos from platforms like YouTube, Vimeo, Rumble, Wistia, etc.
Additionally, you can enrich your video lessons with text content, offering more detailed explanations. Payhip’s rich text editor makes content more engaging. You also have the option to include downloadable files, with a maximum size limit of 2GB.
In the lesson settings, there’s a feature that lets you decide whether to allow students to download the video. This can be a convenient option for students who wish to view content offline.
Text Lesson
When you’re setting up a text lesson in Payhip, you have a full suite of text editing tools. You can craft your lesson with headings and paragraphs and emphasize key points using bold, italic, or underline styles. The platform allows you to align your text and customize the colors of both the text and the background for visual impact. Creating lists, whether bulleted or numbered, helps you structure your content clearly, and you can also link to additional resources. If you want to add a multimedia element, you can include images and videos within your text. These features aim to make your lessons both engaging and easy to understand.
Additionally, some lesson settings are common to both video and text lessons, such as enabling a free preview, setting prerequisites, and allowing discussions. If you check “Make this lesson a prerequisite,” it means students have to complete this lesson before they can go to the next one. For text lessons with multimedia, teachers can even remove the course player margins for a cleaner look. These tools and settings work together to provide a flexible and interactive learning environment for your students.
Quiz Lesson
The lesson-type quiz is an educational tool that enables teachers to create multiple-choice quizzes for their students. Teachers have the option to create a pool of questions that they can use for the quiz. In the lesson settings, teachers can specify a passing grade for the quiz. This is the minimum score a student must achieve to pass the quiz. Teachers can choose to randomize the order of questions. This means that each student may receive the questions in a different sequence, which can help prevent cheating. Furthermore, teachers can choose how many questions from their question bank to show in the quiz.
Download Lesson
In the lesson type download, teachers can upload files for their students to access. Teachers can upload educational materials, such as documents, presentations, or pdf files. The platform supports files up to a maximum size of 2GB. Teachers can write text that will appear above the uploaded files.
Survey Lesson
Payhip’s online course platform includes a survey creation tool that empowers teachers to engage with their students and gather feedback effectively. It’s really easy to use. Teachers can create different kinds of questions for their students to answer.
Teachers can create a survey to allow students to select either one correct answer or multiple correct answers. The user can also create surveys for students to rate, like how much they liked a lesson.
Teachers can make a copy of a previous question by pressing the Duplicate button and updating a few details to use it again. This makes it quick to set up a new survey. Plus, if there are any questions that students don’t have to answer, the teacher can mark them as optional. This means students can skip these questions if they want to.
Assignment Lesson
The “Assignment” lesson type evaluates students’ skills. In this mode, teachers can provide a template, which serves as a guide for students to follow when completing their assignments. Additionally, teachers can write detailed instructions that outline the expectations and criteria for the assignment. Teachers have the option to set a file size limit for student submissions. To prevent getting files that are too big, you can set a file size range from 1 MB to 100 MB. Moreover, teachers can set up a confirmation message that students will see after they submit their assignment.
Embed Code Lesson
In the “Embed Code” lesson type on Payhip’s online course platform, teachers can incorporate external content into their courses. Teachers can add external content using embed codes to their course pages. These contents can be videos, interactive tools, and other resources from the web. Teachers can include explanatory text with the embedded content, either above or below the embed code. You have the ability to apply rich text formatting to this text. Additionally, teachers can provide downloadable content for their students. The platform allows file uploads with a maximum limit of 2GB.
Once you’ve entered all the necessary information and chosen the lesson type, click on the “Save Changes” button to add the lesson to your course. If you make a mistake or change your mind, you can use the “Delete Lesson” option to remove it. Remember to preview your lesson to ensure everything looks as expected before finalizing it.
Payhip’s online course platform imposes no restrictions on file sizes for uploads. You have the flexibility to add as many sections and lessons as you need.
Step 5: Manage Course Setting
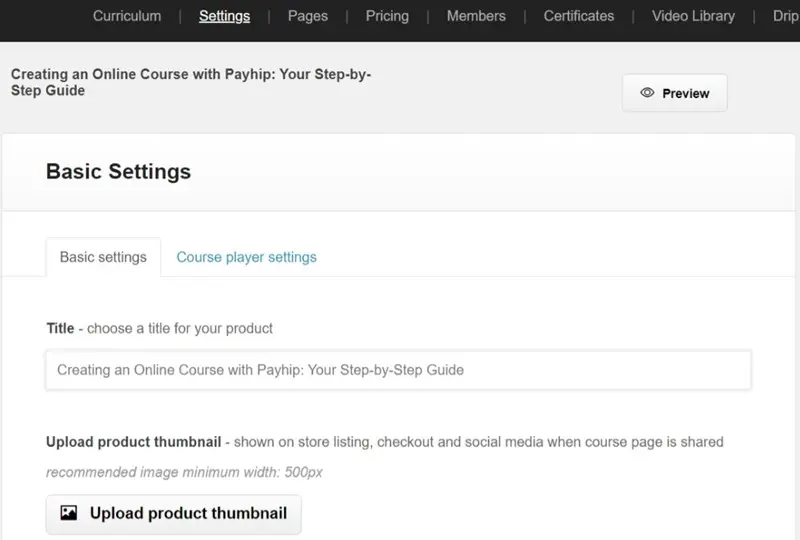
Once you’ve completed the curriculum section of your online course on Payhip, you can proceed to the settings tab. This section allows you to personalize your course by renaming the title and uploading a product thumbnail. Your store listing and checkout page will show your thumbnail. When you share your course page on social media platforms, it will also display the thumbnail. It’s important to note that Payhip recommends using an image with a minimum width of 500 pixels to make sure it looks good on all displays.
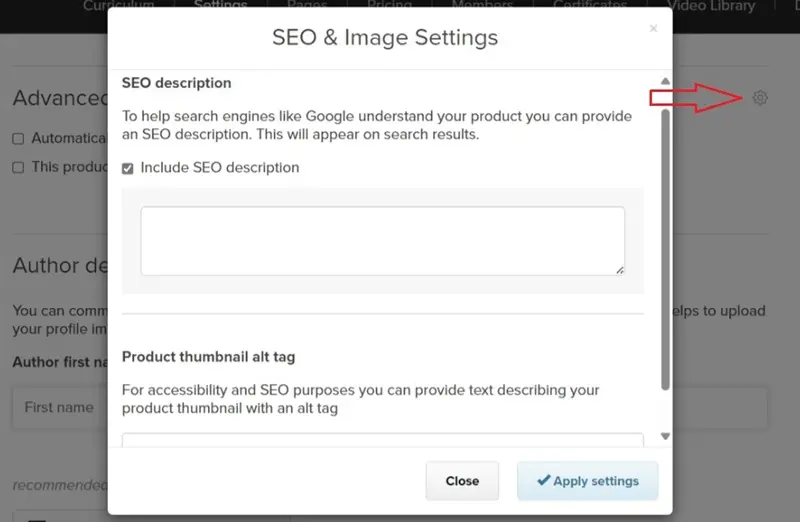
In the advanced options section, you have the choice to automatically add customers who purchase your course to your mailing list. You can also choose if your product should be exempt from taxes. In the Advanced Options, there is a small setting tab on the right side. Click on it and tick the “Include SEO description” option to write an SEO description of the current course. Additionally, teachers can write an alt tag for the product thumbnail and then press “Apply settings.”
Finally, at the bottom of the basic settings tab, there’s an option to add your author details. This is where you can choose to share your real name with your students, adding a personal touch to your course.
Customize Course Player
In the settings tab, you have the option to customize the course player. You can choose between a light or dark theme. Additionally, you can change the course player’s color scheme to align with your branding. You can also upload a logo for the course player, which will display on the top bar and give your course a professional appearance. For those with coding knowledge, there’s the flexibility to add custom CSS to further personalize the course player’s appearance.
Step 6: Manage Course Sales Page
In the “Pages” tab, teachers can see their course’s checkout page, sales page, and thank-you page, allowing them to make necessary edits and ensure these pages effectively communicate with students.
Step 7: Manage Course Pricing
Next, go to the ‘Pricing’ tab and click on ‘Add Pricing Plan’. This will take you to a new section where you can create your pricing plan. Here, you can set up a one-time payment or recurring payments. For recurring payments for subscription plans, you have options like weekly, bi-weekly, monthly, every 3 months, every 6 months, or yearly payments. You can even choose a specific number of monthly payments. If you want, you can give students free access to your content by creating a free plan. In the subscription section, teachers have the option to activate a free trial period for their courses. After the free trial, teachers can set up the first payment to keep the course going.
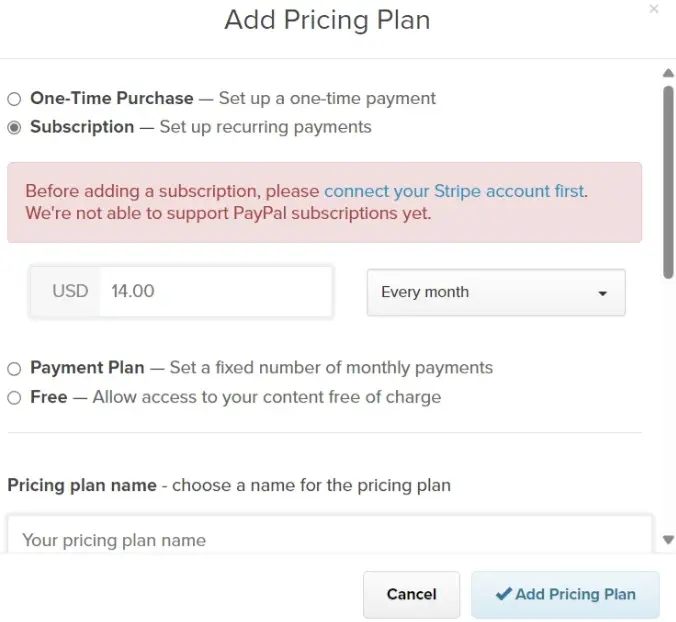
Before you can add subscription plans to your course, you need to connect your Stripe account. Simply click on “Connect your Stripe account first” under the subscription section. The course’s pricing plan does not include PayPal as a payment option.
When you set up your plan, choose a name and write a simple explanation for your customers. After that, click on ‘Add Pricing Plan’ to finalize it. Once you set up a pricing plan, you cannot change the price. If you need to adjust the price, you’ll have to create a new plan with the updated pricing. When a student signs up for a subscription plan, their information will be visible in the “Members” tab.
Step 8: Create Certificates
To celebrate your students’ achievements, you can create personalized certificates in the “Certificate” tab of your course platform. To begin creating a new certificate, click “Add First Certificate.” You will need to name it first. Then, you’ll navigate through three customization tabs: “Theme,” “Content,” and “Design.”
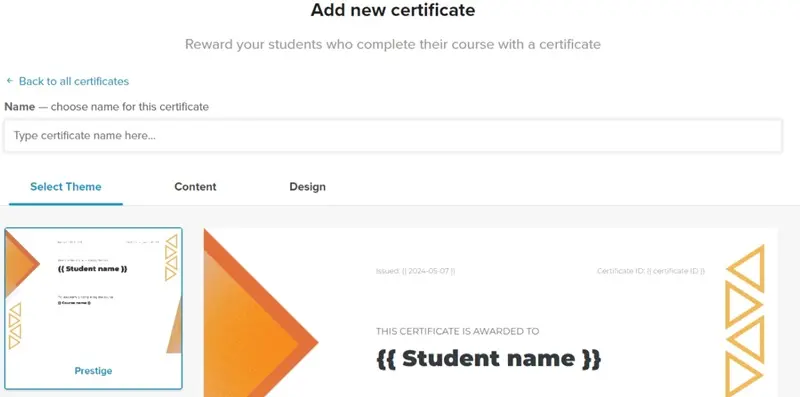
The “Theme” tab offers seven certificate styles to choose from. In the “Content” tab, you can customize the certificate text, and the system will automatically fill in the student’s name and course title. You have the option to add the issue date, a unique certificate ID, and any additional text you wish to include. The “Design” tab allows you to select fonts, color schemes, and even upload a custom background image and logo to make the certificate truly unique. Once you’ve made all your selections and assigned the certificate to the course, simply hit ‘Save Changes’ to finalize your design.
When a student gets to the last lesson of their course, they will see a button that says “Complete and Continue.” When you click this button after finishing the last lesson, the system will confirm that the student has met all the course requirements. As a result, the system automatically awards the student a certificate of completion.
Step 9: Create Drip Schedule
Drip schedules allow you to control when students get access to course materials. You can make a plan to share the content over time. Navigate to the Drip section and select the ‘Create Drip Schedule’ button. You get three choices:
- Allow students to access the course content immediately upon registration.
- Show content when a student looks at the course for the first time.
- Pick a specific date to make the course available.
Step 10: Connect Domain
To change your default free Payhip domain, start by going to the Account tab on the top navigation bar and selecting Settings. Move down the page and select your store page username.

If you want to use a top-level domain, you’ll need to purchase one from a third-party provider like NameSilo. Once you have your domain, log in to your DNS provider’s website and link your custom domain to Payhip.
Must-See Content: Discover the 11 Best Domain Registrars for Your Website
Here’s how to set it up:
- Change the type “A Record” host “@” to point to Payhip’s IP address value, which is 45.154.183.183.
- Update the type “CNAME Record” record for host “www” to value domains.payhip.com.

After saving these settings with your DNS provider, go back to your Payhip dashboard. At the top of the page, click on “Store” and then select “Domains.” Click on Connect Existing Domain, and a window will pop up. Enter your domain name there, and click Continue. Lastly, click Verify Connection to finish the process. Remember, it might take 24-48 hours for the domain changes to take effect.
Step 11: Create Blog

To create a blog, click Store at the top of the page. From there, you need to select the Blog Posts tab, where you’ll find an option to add a new blog post. This will take you to the section where you can manage all your blog-related activities. Once you’re in the Blog Posts area, start writing a new post for your blog, where you can share updates, insights, or stories relevant to your online courses.
Step 12: Launch Your Store Builder
Teachers can make a website for their online course for free with Payhip. Simply click on “Store” at the top of the page, and then select “Launch Your Store Builder” from the store tab. With Payhip Store Builder, teachers possess the necessary tools to set up and personalize every page on their website. Payhip Store Builder lets you create a professional-looking website for your online courses, even if you don’t have WordPress.

When you first try the Payhip store builder, it might seem hard to understand. As you keep working on it, it will start to feel much simpler.
Step 13: Marketing
Payhip provides a full range of marketing tools designed to help you effectively connect with your customers. You can access these tools for free by choosing “Marketing” from the top navigation bar. You can use these tools to start promotional campaigns, create coupon codes, and apply them to all your products, specific ones, or various pricing plans. Running sales with these coupons can motivate customers to make purchases at discounted rates for a set time.

Additionally, the marketing tab provides the capability to set up an affiliate and referral system. This system allows you to involve your friends and fans in promoting your products, rewarding them for their efforts. To further enhance your marketing, you can organize your mailing lists for automatic customer subscriptions. If you offer more than one product, you can utilize cross-selling techniques. For example, you can enhance the shopping experience and boost sales by suggesting extra products at checkout, such as offering a second item at half price when a customer buys one.
Step 14: Edit Course
If you want to make changes to your course, it’s a simple process. First, click on the Products link in the top navigation bar, then hit the Manage button. This gives you the option to add or remove content from your course. To see what your online course page looks like to students, just press the View button. You can duplicate or delete your course. If you’re looking to change the design of your course page, you can do that through the Payhip Store builder. And if you’re ready to start a new course, you can create one by clicking the Add New Product button. This flexibility allows teachers to easily manage and update their course offerings.

Student Reviews
Activating student reviews on your course pages is a simple process. First, press the “Reviews” button. Then click “Reviews Settings.” In this section, you’ll find an option to “Enable Customer Reviews”—make sure to check this box. Doing so will reveal additional settings. Among these new options, you’ll see “Course Products.” Check this box to allow students to leave reviews on your course pages.
Must-See Content: Payhip: How to Create a Free Website to Sell Digital Products?
Step 15: Publish the Course
Once you’ve arranged the course content and designed the website layout, the next step is to make the course available to your audience. This is the final stage where your course goes live for students to enroll and learn. Start by selecting “Products” from the top menu, then choose “Manage.” Finally, navigate to the Publish tab. This is where you can release your online course to the public and share it with your students. In the publish tab, teachers have the option to enable course preorder. Students who preorder will find the course on their Student Dashboard, marked “Coming soon.”
Conclusion
You can create a free online course website with Payhip quickly and easily. It only takes a few minutes to complete. This blog will guide you through fifteen easy steps to creating your course. It covers everything from designing your website with the store builder to managing your products and publishing your content. This means you can devote more time to sharing your knowledge and building relationships with your students.
If you’re a teacher, Payhip has everything you need to make online teaching easy. It helps you create a fun learning environment and share your knowledge with people all over the world.

Author: Asif
Asif is a freelance writer who shares his knowledge and experience on how to build and run a successful online business. Whether you are a beginner or a pro, you will find valuable tips and resources on his blog » NewOfferSee Digital Time »
Contact Asif via the NewOfferSee Contact Us form.
Follow Asif on his Quora “DigitalTime” Profile.

